Latest crips golden pastry recipe in 2025 Delightful, flaky, golden perfection, irresistible aroma, buttery bliss, crispy joy, heavenly treat, scrumptious delight.
let’s start making
Crisp Golden Pastry Recipe
Ingredients:
250g all-purpose flour
200g unsalted butter (cold, cubed)
1 tsp salt
100ml cold water
1 tbsp sugar (optional, for a slight sweetness)
Instructions:
Prepare the Dough: In a large bowl, mix the flour and salt. Add the cold cubed butter and rub it into the flour with your fingertips until the mixture resembles coarse breadcrumbs.
Add Water: Gradually add cold water, mixing with a fork until the dough begins to come together. Turn it onto a lightly floured surface and knead gently into a smooth ball.
Chill: Wrap the dough in plastic wrap and refrigerate for 30 minutes.
Roll and Fold: On a floured surface, roll the dough into a rectangle. Fold the top third down to the center, then the bottom third up over that. Rotate 90 degrees, roll out again, and repeat the folding process. Chill for another 30 minutes.
Final Roll: Roll out the dough to your desired thickness (about 3-4mm). Use as needed for pies, tarts, or vol-au-vents.
Bake: Preheat oven to 200°C (400°F). Place the pastry on a baking sheet, brush with egg wash (1 egg beaten with 1 tbsp water) for a golden finish, and bake for 20-25 minutes or until crisp and golden.
Nutrition Information (per 100g of baked pastry):
Calories: 450 kcal
Total Fat: 30g
Saturated Fat: 18g
Carbohydrates: 40g
Sugars: 1g (if sugar is added)
Protein: 5g
Sodium: 300mg
Allergy Advice:
Contains: Wheat (gluten), Milk (butter)
May contain: Egg (if egg wash is used)
Suitable for vegetarians if egg wash is omitted.
Not suitable for individuals with gluten or dairy allergies.
The Irish Beef Stew is a hearty, comforting, flavorful dish with tender beef, vibrant vegetables, and a savory, rustic, warm, delicious, satisfying taste.
Let’s start cooking
Ingredients (Serves 6)
1 lb (450g) beef chuck, cut into small 1-inch cubes
2 tbsp olive oil
1 medium onion, diced
2 cloves garlic, minced
3 medium carrots, sliced into 1/2-inch rounds
3 medium Yukon Gold potatoes, sliced into 1/2-inch pieces
2 cups low-sodium beef broth
1/2 cup Guinness stout beer
1 tbsp tomato paste
1 tsp Worcestershire sauce
1 tsp fresh thyme leaves (or 1/2 tsp dried thyme)
2 bay leaves
Salt and pepper to taste
2 tbsp fresh parsley, chopped (for garnish)
1 tbsp flour (for thickening)
Instructions
Prepare the Beef: Pat the beef cubes dry with a paper towel. Season with salt and pepper, then lightly dust with flour.
Brown the Beef: Heat 1 tbsp olive oil in a large Dutch oven or heavy pot over medium-high heat. Brown the beef in batches, about 3-4 minutes per batch, ensuring a nice sear for bright color. Set aside.
Cook Aromatics: In the same pot, add the remaining 1 tbsp olive oil. Sauté the onion and garlic over medium heat until softened, about 3 minutes.
Build the Stew: Stir in the tomato paste and cook for 1 minute. Add the Guinness, scraping up any browned bits. Simmer for 2 minutes to reduce slightly.
Simmer: Add the beef broth, Worcestershire sauce, thyme, bay leaves, and browned beef. Bring to a simmer, then reduce heat to low. Cover and cook for 1 hour, stirring occasionally.
Add Vegetables: Add the sliced carrots and potatoes. Simmer, uncovered, for another 30-40 minutes, until the vegetables are tender and the beef is soft.
Adjust and Serve: Remove bay leaves. Season with salt and pepper to taste. Garnish with fresh parsley. Serve in a rustic pottery bowl.
Nutrition Information (Per Serving)
Serving Size: 1/6 of the recipe (approximately 1.5 cups)
Calories: 320 kcal
Carbohydrates: 25g (8% DV)
Protein: 28g (56% DV)
Fat: 12g (18% DV)
Saturated Fat: 3g (15% DV)
Cholesterol: 70mg (23% DV)
Sodium: 600mg (26% DV)
Fiber: 4g (16% DV)
Sugar: 5g
Note: Percent Daily Values (DV) are based on a 2,000-calorie diet. Nutrition is an estimate.
Allergy Advice
Contains: Gluten (from flour; can be substituted with cornstarch). Worcestershire sauce may contain fish (anchovies); check labels.
May Contain Traces: Possible traces of gluten or soy in beef broth and Guinness.
Dairy-Free: No dairy.
Nut-Free: No nuts.
For Allergies: Use fish-free Worcestershire sauce if needed. For gluten-free, replace flour with a cornstarch slurry and ensure all ingredients are gluten-free.
1 ½ cups (150g) chocolate cookie crumbs (gluten-free if needed)
¼ cup (50g) granulated sugar
½ cup (115g) unsalted butter, melted
For the Raspberry Cheesecake Filling:
24 oz (680g) cream cheese, softened
¾ cup (150g) granulated sugar
3 large eggs
1 cup (240ml) sour cream
1 tsp vanilla extract
½ cup (120g) raspberry puree (from fresh or frozen raspberries, strained to remove seeds)
1 tbsp cornstarch
For the Topping:
½ cup (85g) semi-sweet chocolate chips
¼ cup (60ml) heavy cream
2 tbsp golden sprinkles (edible, ensure they’re free of allergens if needed)
Instructions
Prepare the Crust:
Preheat your oven to 350°F (175°C).
Mix the chocolate cookie crumbs, sugar, and melted butter in a bowl until well combined.
Press the mixture evenly into the bottom of a 9-inch (23cm) springform pan.
Bake for 10 minutes, then set aside to cool.
Make the Cheesecake Filling:
In a large bowl, beat the cream cheese and sugar with an electric mixer until smooth.
Add the eggs one at a time, mixing on low speed until just combined.
Mix in the sour cream, vanilla extract, raspberry puree, and cornstarch until fully incorporated.
Pour the filling over the cooled crust and smooth the top.
Bake the Cheesecake:
Place the springform pan in a larger roasting pan. Pour hot water into the roasting pan to come 1 inch up the sides of the springform pan (this water bath helps prevent cracking).
Bake at 325°F (165°C) for 50-60 minutes, until the edges are set but the center is slightly jiggly.
Turn off the oven, crack the door, and let the cheesecake cool in the oven for 1 hour. Then, refrigerate for at least 4 hours or overnight.
Add the Topping:
Heat the heavy cream until just simmering, then pour over the chocolate chips in a heatproof bowl. Stir until smooth to create a ganache.
Drizzle the ganache over the chilled cheesecake, letting it drip down the sides.
Sprinkle the golden sprinkles over the top.
Serve:
Slice and serve chilled. Optionally, dust the plate with cocoa powder for a decorative touch, as seen in the images.
Nutritional Information (Per Serving, 1/12 of the cake)
Calories: 420 kcal
Total Fat: 32g
Saturated Fat: 19g
Cholesterol: 115mg
Sodium: 220mg
Total Carbohydrates: 28g
Dietary Fiber: 1g
Sugars: 22g
Protein: 7g
Note: Nutritional values are approximate and can vary based on specific brands of ingredients used. This calculation assumes a 12-slice yield.
Allergy Advice
Contains: Dairy (cream cheese, sour cream, butter, heavy cream), Eggs, Gluten (if using regular chocolate cookies), and possible Soy (in some chocolate#Allergen Alert: Some golden sprinkles may contain artificial colorsVegan Alert: If unsure, confirm with the user whether the platform allows for the inclusion of a video or image related to allergens. I can include an image if needed.
Dairy: This recipe contains dairy products in the form of cream cheese, sour cream, butter, and heavy cream. Those with dairy allergies should avoid this recipe or substitute with non-dairy alternatives (e.g., vegan cream cheese, coconut cream, or cashew-based cream for the filling; vegan butter for the crust; and a dairy-free chocolate for the ganache).
Eggs: The cheesecake filling includes eggs. For those with egg allergies, this recipe is not suitable unless a vegan egg substitute is used (e.g., flaxseed mixed with water or a commercial egg replacer, though results may vary).
Gluten: The chocolate cookie crumbs in the crust contain gluten. Use certified gluten-free chocolate cookies for a gluten-free version.
Soy: Some chocolate chips may contain soy lecithin. Check labels and use soy-free chocolate if necessary.
Nuts: This recipe is nut-free unless the golden sprinkles contain traces of nuts—check the label.
Other Considerations: If the raspberries or other ingredients are processed in facilities that handle allergens, cross-contamination may occur. Always check labels for potential allergens.
This recipe can be adapted for dietary restrictions, but substitutions may affect the texture and flavor. For example, using non-dairy cream cheese might result in a slightly softer cheesecake, and gluten-free cookie crumbs may alter the crust’s texture.
Anmitsu is a delightful Japanese dessert featuring sweet agar jelly, red bean paste, fruit, mochi, and syrup, creating a refreshing, colorful, and traditional treat with a unique, light, and harmonious flavor profile that is both wholesome and enjoyable.
Anmitsu (Japanese Dessert)
Let’s start cooking
Recipe (Serves 4)
Ingredients:
Kanten (Agar) Jelly:
4 g kanten powder (or 1 tsp agar powder)
2 cups water
2 tbsp sugar
Red Bean Paste (Anko):
1 cup canned or homemade red bean paste (sweetened)
Fruits:
1 mandarin orange, peeled and segmented
1 kiwi, peeled and sliced
4 strawberries, halved
Dango (Sweet Dumplings):
½ cup mochiko (sweet rice flour)
2–3 tbsp water (adjust for dough consistency)
1 tsp sugar
Syrup:
¼ cup brown sugar
¼ cup water
Optional: Scoop of vanilla ice cream (omit for dairy-free)
Instructions:
Prepare Kanten Jelly:
In a saucepan, dissolve kanten powder in 2 cups of water over medium heat, stirring constantly.
Once it boils, reduce heat, add sugar, and stir until dissolved (about 2 minutes).
Pour into a shallow dish and let it cool to room temperature, then refrigerate for 1 hour until set. Cut into small cubes.
Make Dango:
Mix mochiko and sugar in a bowl. Gradually add water until a soft, pliable dough forms.
Roll into small balls (about 1 inch in diameter).
Boil a pot of water, add dango balls, and cook until they float (about 3–4 minutes). Transfer to cold water to cool, then drain.
Prepare Syrup:
In a small saucepan, combine brown sugar and water. Heat over medium, stirring until sugar dissolves. Let it cool.
Assemble Anmitsu:
In each serving bowl, add a few cubes of kanten jelly, a spoonful of red bean paste, a few dango balls, and assorted fruits.
Drizzle with the brown sugar syrup. Add a scoop of ice cream if desired.
Vitamin C: 20% of Daily Value (DV) (from fruits like kiwi and strawberries)
Iron: 4% of DV (from red bean paste)
Note: Nutritional values are approximate and can vary based on specific brands and portion sizes. The values exclude ice cream unless specified.
Allergy Advice
Potential Allergens:
Gluten: Mochiko (sweet rice flour) is naturally gluten-free, but if you’re using store-bought red bean paste, check the label for additives that may contain gluten.
Dairy: This recipe is dairy-free without the optional ice cream. If you include ice cream, it will contain dairy (milk).
Soy: Some red bean pastes may contain soy-based additives; always check the label.
Nuts: This recipe is nut-free, but cross-contamination can occur if ingredients are processed in facilities that handle nuts.
Cross-Contamination Risk: If preparing in a kitchen that handles allergens like dairy, soy, or gluten, ensure utensils and surfaces are thoroughly cleaned to avoid cross-contamination.
Substitutions:
For dairy allergies, omit the ice cream or use a dairy-free alternative.
For soy allergies, ensure the red bean paste is soy-free or make your own using azuki beans and sugar.
If you have severe allergies, consult with a healthcare professional before trying this recipe, and always double-check ingredient labels.
This Anmitsu recipe is a light, refreshing Japanese dessert that balances sweetness and texture, perfect for a variety of diets when prepared with care. Let me know if you’d like a recipe for another dish from the image!
1 tsp red chili flakes (adjust to taste for spiciness)
400g canned crushed tomatoes
1 tsp sugar (optional, to balance acidity)
Salt, to taste
Fresh basil leaves, for garnish
Grated Parmesan cheese (optional, for serving)
Steps:
Cook the Pasta: Bring a large pot of salted water to a boil. Add the spaghetti and cook according to package instructions (about 8-10 minutes) until al dente. Drain, reserving 1/2 cup of pasta water.
Prepare the Sauce: In a large skillet, heat olive oil over medium heat. Add minced garlic and chili flakes, sautéing for 1-2 minutes until fragrant (be careful not to burn the garlic).
Add Tomatoes: Stir in the crushed tomatoes and sugar (if using). Season with salt. Simmer the sauce for 10-15 minutes, stirring occasionally, until it thickens slightly.
Combine Pasta and Sauce: Add the cooked spaghetti to the skillet with the sauce. Toss to coat, adding reserved pasta water a little at a time if the sauce is too thick.
Serve: Divide the pasta into 4 servings. Garnish with fresh basil leaves and a sprinkle of Parmesan cheese, if desired.
Nutritional Information (Per Serving):
Calories: 480 kcal
Protein: 14g
Fat: 10g (Saturated: 1.5g)
Carbohydrates: 85g (Sugars: 8g)
Fiber: 5g
Sodium: 420mg Note: Nutritional values are approximate. Parmesan cheese adds about 50 kcal and 4g of protein per serving if included.
Allergy Information:
Contains: Gluten (from spaghetti), potential dairy (if using Parmesan cheese).
May Contain: Traces of eggs (some dried pastas are processed in facilities that handle eggs).
Free From: Nuts, soy, shellfish, fish. Note: For gluten allergies, use gluten-free pasta. For dairy allergies, omit Parmesan cheese.
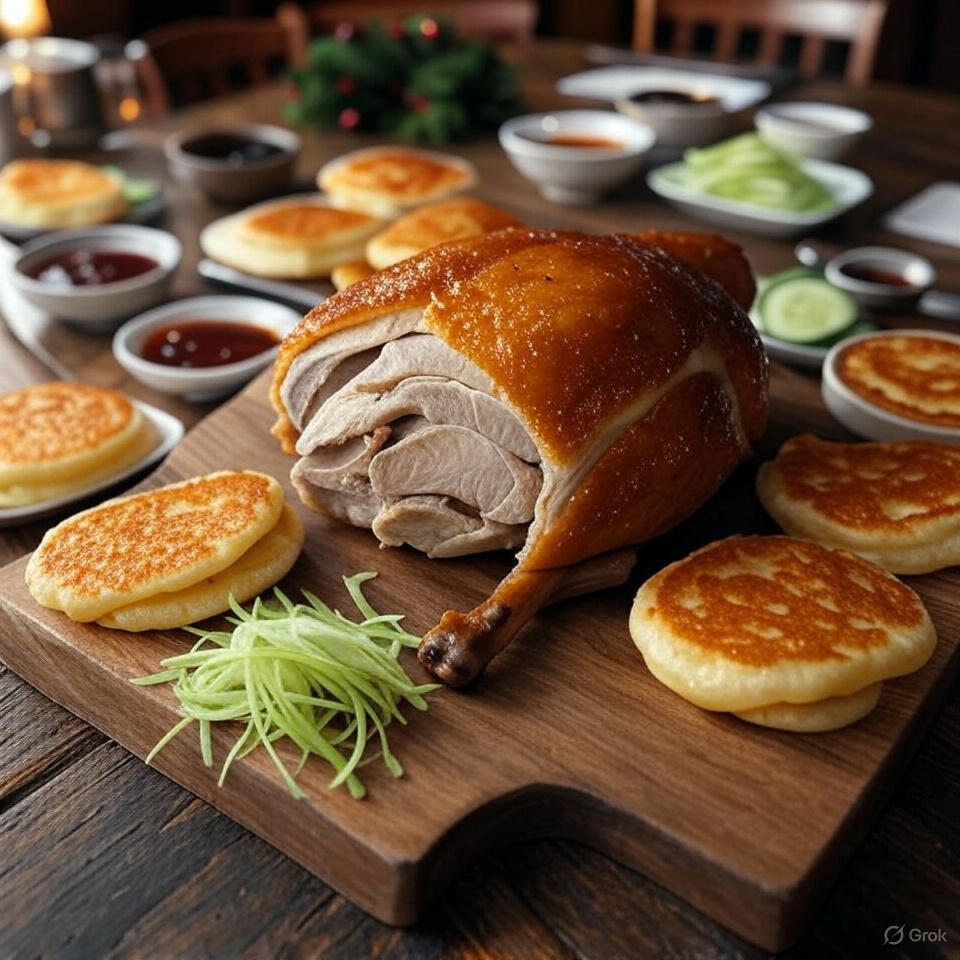
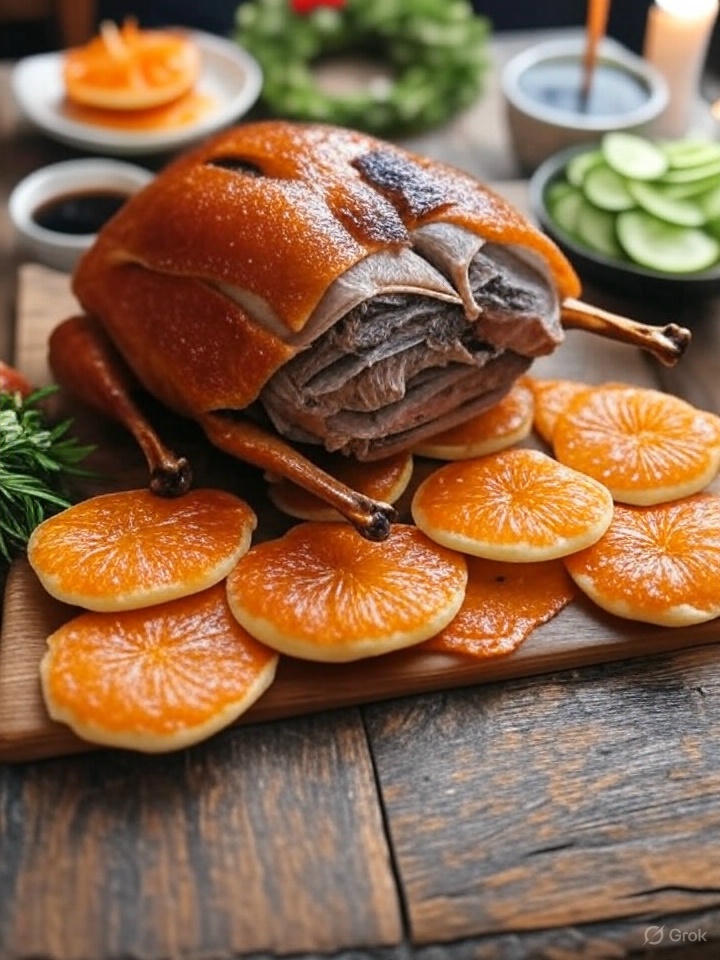
12-16 Mandarin pancakes (store-bought or homemade)
Hoisin sauce (for serving)
Instructions:
Pat the duck dry with paper towels. Mix honey, soy sauce, and five-spice powder. Rub the mixture inside and outside the duck. Let it marinate in the fridge for 12-24 hours.
Preheat oven to 350°F (175°C). Place duck on a rack in a roasting pan.
Dissolve maltose and rice vinegar in 1/2 cup warm water. Brush the mixture over the duck skin. Let it air-dry for 4-6 hours in a cool, ventilated area or fridge.
Roast the duck for 1.5-2 hours, turning every 30 minutes to ensure even cooking. Increase oven to 400°F (200°C) for the last 15 minutes to crisp the skin.
Rest the duck for 15 minutes, then carve the skin and meat into thin slices.
Serve with warm pancakes, hoisin sauce, green onions, and cucumber.
Nutrition Information (Per Serving, based on 4 servings):
Calories: 600 kcal
Protein: 45 g
Fat: 40 g
Saturated Fat: 12 g
Carbohydrates: 15 g
Sugars: 8 g
Sodium: 800 mg
Cholesterol: 180 mg
Note: Nutritional values are estimates and may vary based on duck size, preparation methods, and specific ingredient brands. Adjust portions and consult a nutritionist for precise dietary needs.
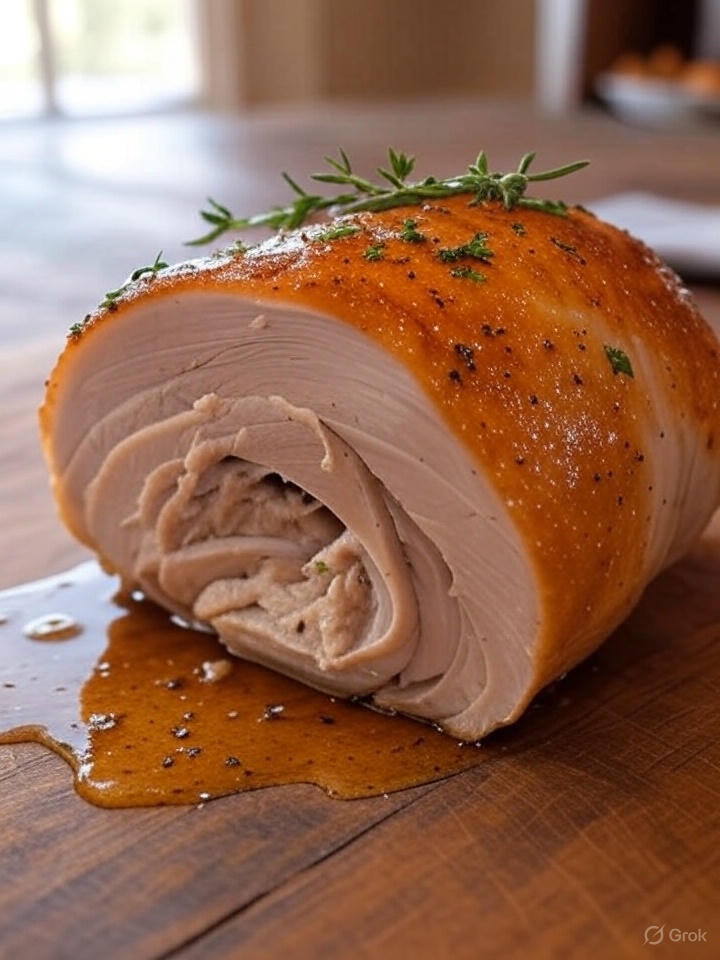
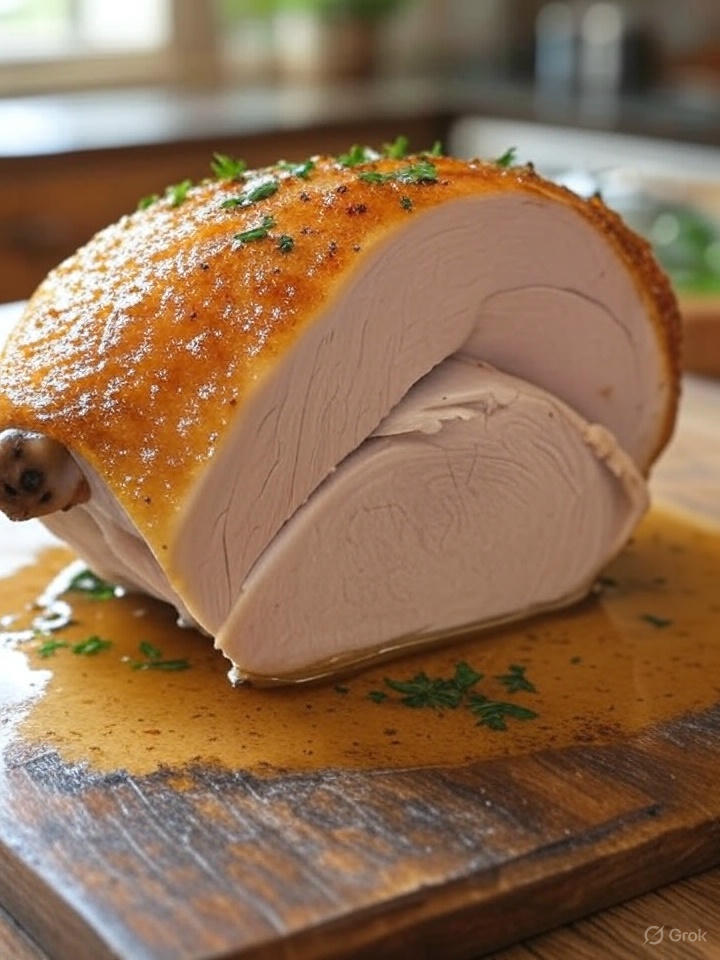
Prepare Herb Mixture: In a small bowl, combine olive oil, rosemary, thyme, sage, minced garlic, salt, pepper, and lemon zest to form a paste.
Butterfly and Season: Place turkey breast skin-side down on a cutting board. Butterfly thicker parts for even thickness (~1 inch). Spread half the herb mixture over the meat.
Roll and Tie: Roll the turkey tightly into a log, skin on the outside. Secure with kitchen twine at 2-inch intervals.
Apply Remaining Herbs: Rub the outside with the remaining herb mixture.
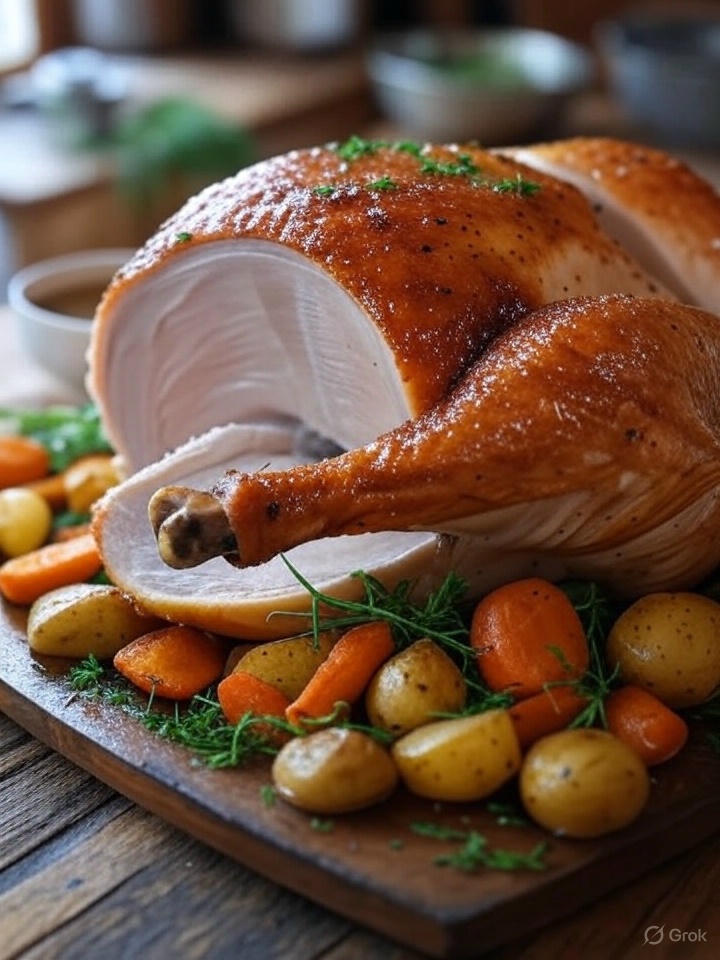
Roast: Place in a roasting pan, seam-side down. Add chicken broth to the pan. Roast for 1-1.5 hours, until internal temperature reaches 165°F (74°C).
Rest and Slice: Remove from oven, cover loosely with foil, and rest for 10 minutes. Remove twine and slice into 1/2-inch rounds.
Serve: Serve with pan juices or sides like roasted vegetables or mashed potatoes.
Nutrition Information (Per Serving):
Serving Size: 1/6 of recipe (~4 oz or 113g)
Serves: 6
Calories: 180 kcal
Protein: 34g (76% of calories)
Total Fat: 5g (25% of calories)
Saturated Fat: 1g
Trans Fat: 0g
Monounsaturated Fat: 3g
Polyunsaturated Fat: 1g
Carbohydrates: 0g (0% of calories)
Dietary Fiber: 0g
Sugars: 0g
Cholesterol: 90mg
Sodium: 350mg
Potassium: 380mg
Vitamin A: 2% DV
Vitamin C: 1% DV
Calcium: 2% DV
Iron: 8% DV
Notes:
Prep Time: 15 minutes
Cook Time: 1-1.5 hours
Tips:
For crispier skin, increase oven to 400°F (204°C) for the last 10 minutes.
Use a meat thermometer for accurate doneness.
Removing skin after roasting reduces calories to ~150 kcal and fat to ~2g per serving.
Nutrition Notes:
Values are estimates based on a 2.5-pound skin-on turkey breast with recipe ingredients.
Sodium includes 1 tsp kosher salt; pre-brined turkey may increase sodium to 500-600mg per serving.
Percent Daily Values (DV) based on a 2,000-calorie diet. Adjust for individual needs.
Data derived from standard nutritional databases; consult a nutritionist for precise needs.
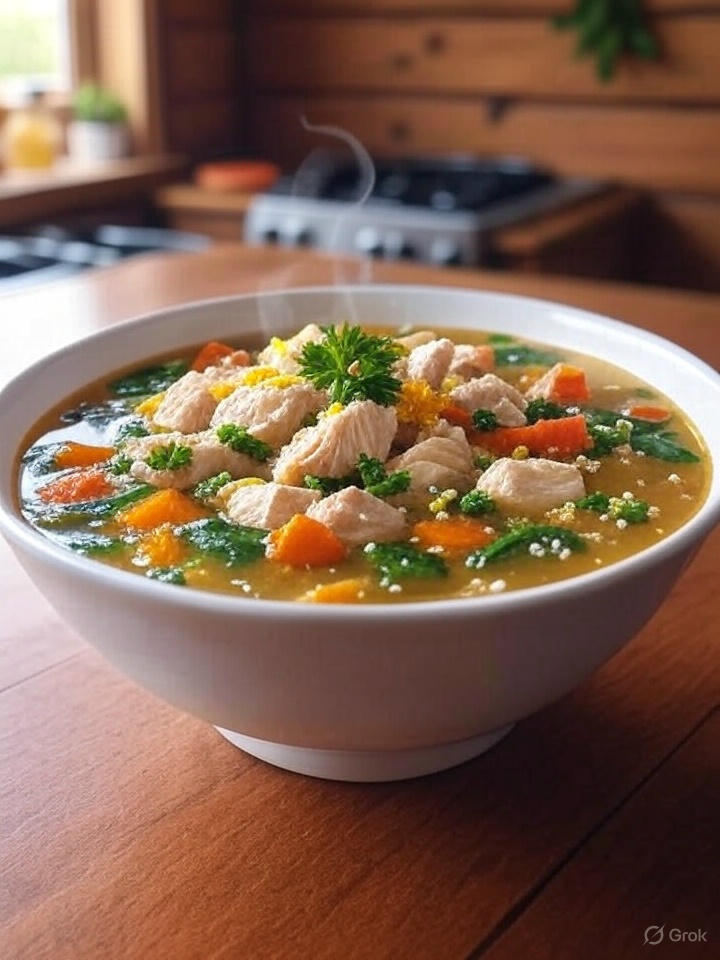
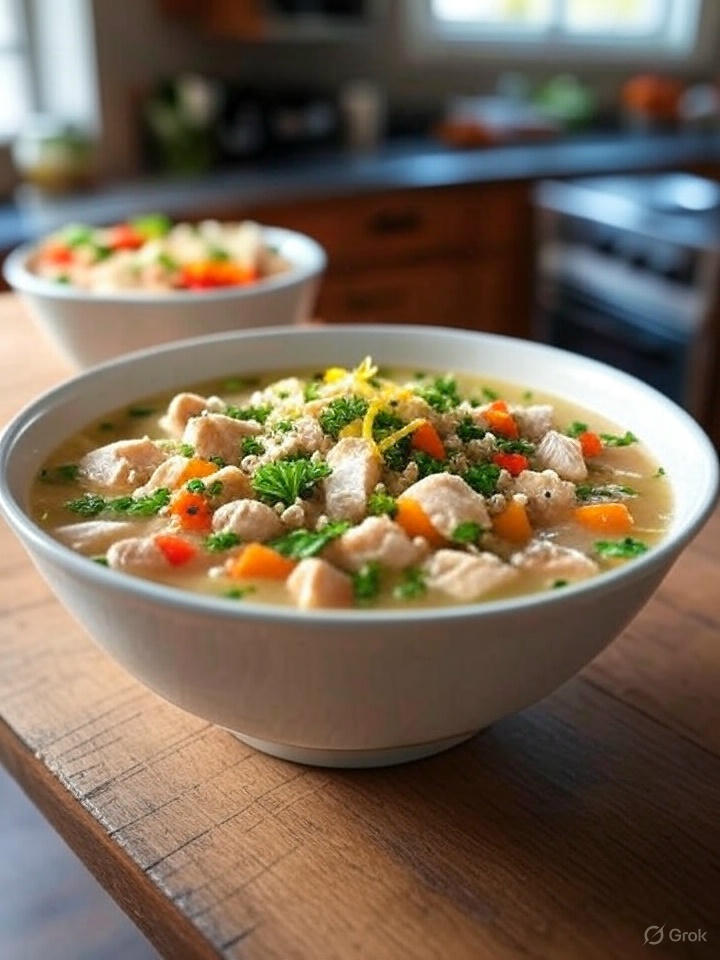
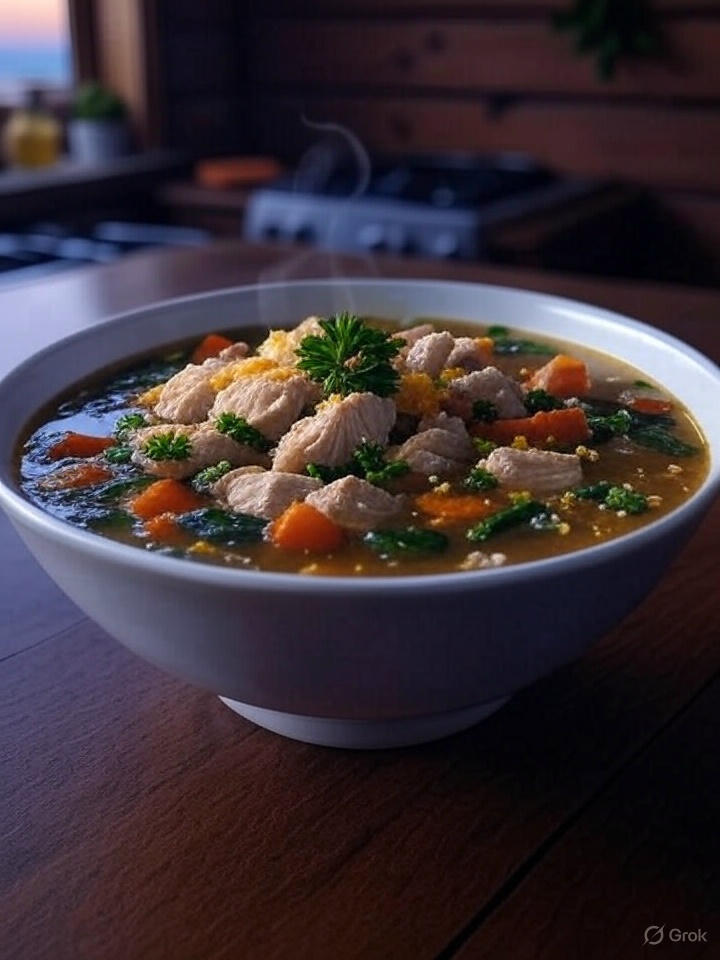
Prep Ingredients: Dice chicken, chop vegetables, grate ginger, and zest lemon.
Sauté Aromatics: Heat olive oil in a large pot over medium heat. Add onion and garlic, cooking until softened (about 3-4 minutes).
Add Vegetables: Stir in carrots, celery, and zucchini. Cook for 5 minutes, stirring occasionally.
Cook Chicken: Add diced chicken and cook until lightly browned (about 5 minutes).
Simmer Soup: Pour in chicken broth, add ginger, thyme, rosemary, bay leaf, and lemon zest. Bring to a boil, then reduce to a simmer for 20 minutes.
Add Quinoa: Stir in cooked quinoa and simmer for an additional 5 minutes. Remove bay leaf.
Season and Serve: Add salt and pepper to taste. Stir in fresh parsley just before serving.
Nutrition Information (Per Serving)
Serving Size: ~1.5 cups (1/6 of recipe)
Calories: 220 kcal
Protein: 22g
Fat: 6g (Saturated: 1g)
Carbohydrates: 18g (Fiber: 3g, Sugars: 4g)
Sodium: 480mg
Cholesterol: 50mg
Notes: Nutrition values are approximate and based on standard ingredient data. Low-sodium broth keeps the soup heart-healthy. Adjust seasoning to preference.
Tips
Storage: Store in an airtight container in the fridge for up to 4 days or freeze for up to 3 months.
Variation: Swap quinoa for brown rice or add a handful of spinach for extra greens.
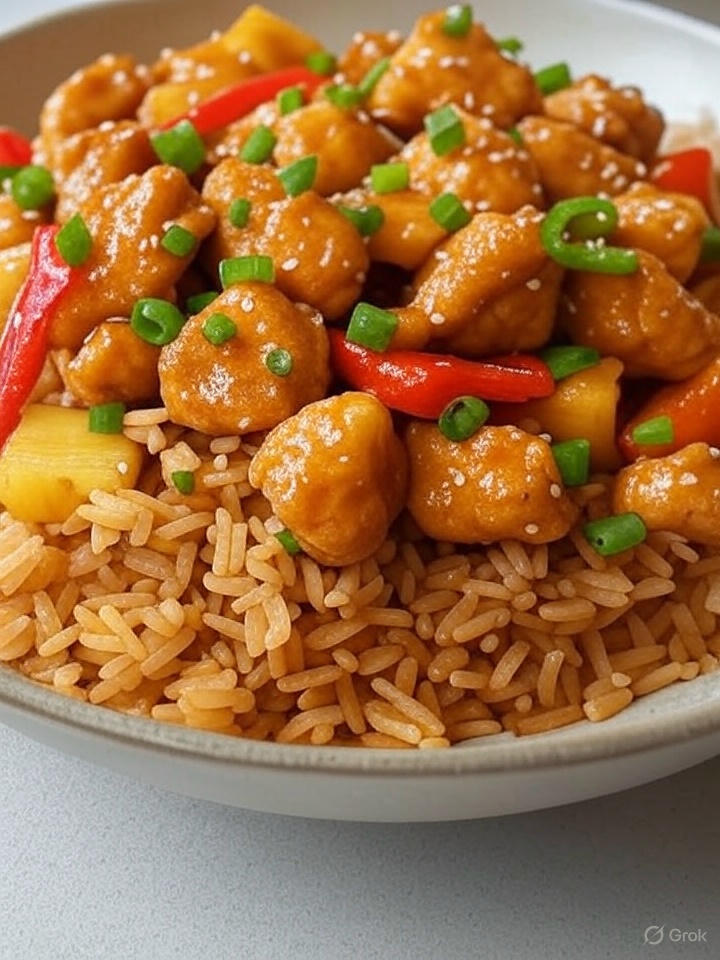
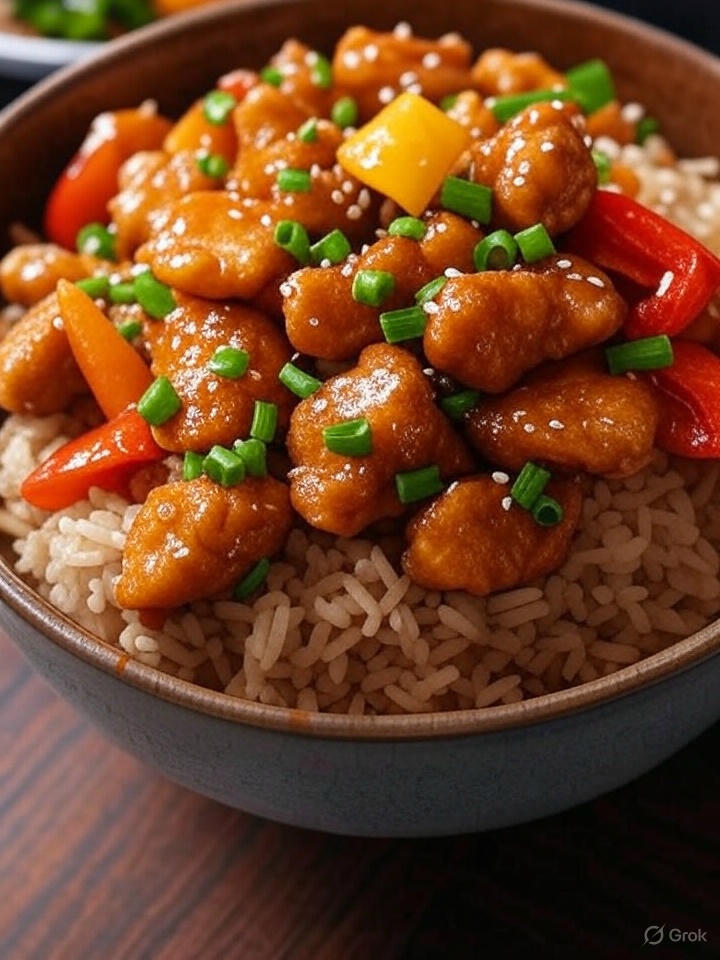
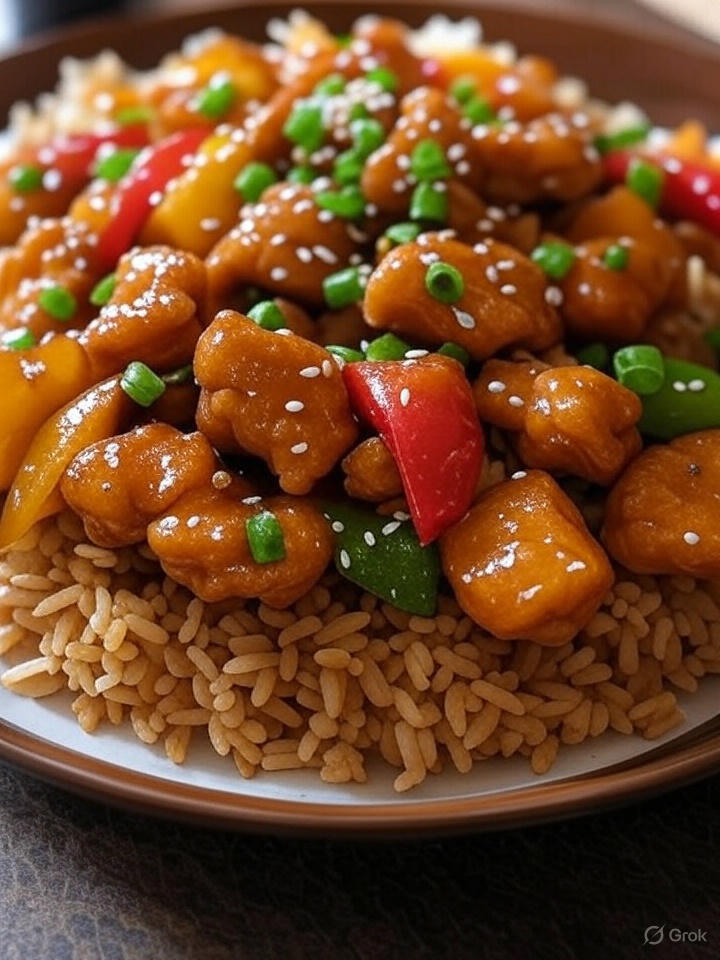
Healthy sweet and sour chicken features lean chicken, vibrant veggies, and a low-sugar sauce. Baked or lightly sautéed, it’s packed with flavor, nutrients, and perfect for a guilt-free meal.
Recipe 1: Healthy Sweet and Sour Chicken (Stovetop, Lower-Sugar)
Vegetables: 2 bell peppers (any color), diced; 1 small onion, diced; 1 cup pineapple chunks (canned in juice, drained, reserve ½ cup juice)
Sauce:
½ cup pineapple juice (from canned pineapple)
¼ cup ketchup
2 tbsp apple cider vinegar
2 tbsp coconut aminos (or low-sodium soy sauce)
1 tsp garlic powder
1 tsp ground ginger
Oil: 1 tbsp avocado oil (or olive oil)
Garnish (optional): Sliced green onions, sesame seeds
Instructions
Prepare Sauce: In a small bowl, whisk together pineapple juice, ketchup, apple cider vinegar, coconut aminos, garlic powder, and ground ginger. Set aside.
Coat Chicken: Toss chicken pieces in tapioca starch or cornstarch to lightly coat.
Cook Chicken: Heat avocado oil in a large skillet over medium-high heat. Add chicken and cook for 4-5 minutes until browned and cooked through. Remove and set aside.
Cook Vegetables: In the same skillet, add bell peppers and onion. Sauté for 3-4 minutes until tender.
Combine: Return chicken to the skillet, add pineapple chunks and sauce. Stir and cook for 2-3 minutes until the sauce thickens.
Serve: Garnish with green onions and sesame seeds, if desired. Serve over brown rice, cauliflower rice, or quinoa.
Nutrition Information (Per serving, without rice)
Calories: ~314 kcal
Protein: 27 g
Carbohydrates: 36 g
Fat: 8 g
Fiber: 4 g
Sugar: 24 g
Sodium: 614 mg
Vitamin C: 163 mg (high due to bell peppers and pineapple)
Note: Nutrition is approximate and depends on exact ingredients used.
Preservation
Refrigerator: Store in an airtight container for up to 4 days. Reheat in a skillet over medium heat or microwave for 1-2 minutes, stirring to maintain texture.
Freezer: Freeze in an airtight container for up to 3 months. Thaw overnight in the fridge and reheat in a skillet to avoid a rubbery texture.